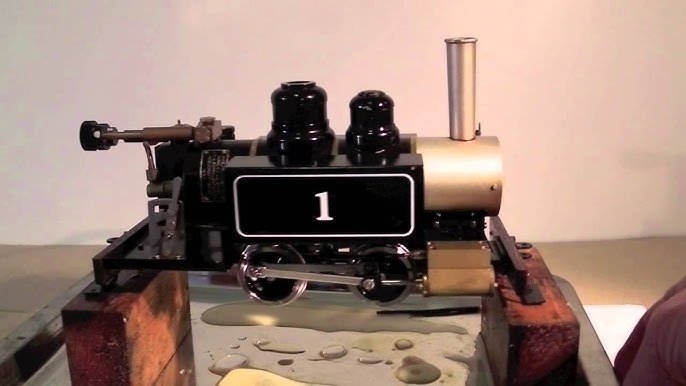
The Accucraft Ruby, a model steam locomotive beloved by hobbyists, combines intricate mechanics with the beauty of steam-driven technology. However, maintaining its performance requires one crucial skill—setting its timing correctly. If you’re passionate about model trains and want to ensure your Ruby runs smoothly, this detailed guide will help you master the art of timing.
Timing is to a steam locomotive what a heartbeat is to a living being—it ensures everything operates in harmony. How to Set the Timing on a Accucraft Ruby, precise timing means smooth operation, better performance, and increased longevity. Let’s dive into the fascinating world of timing adjustments for this charming steam engine.
Understanding the Basics How to Set the Timing on a Accucraft Ruby
What is Timing in Model Steam Engines?
Timing in model steam engines refers to synchronising the opening and closing of steam valves with the movement of the pistons. This ensures that steam enters and exits the cylinders at just the right moment for optimal power.
Why Timing is Crucial for Performance
Incorrect timing can lead to inefficiencies, reduced power, and even long-term damage. It’s like trying to clap on beat in a song—miss the rhythm, and everything feels off.
Key Components Involved in Timing
Cylinders and Pistons
The pistons drive the locomotive’s wheels, and their coordination with the steam valves determines the engine’s efficiency.
Valve Gear System
This mechanism controls the steam flow into and out of the cylinders. For Ruby, proper adjustment of this system is key to accurate timing.
Eccentric Cranks
These small but critical parts adjust the timing of the valve gear. Misalignment here can throw the entire system off.
Tools Needed for Setting Timing
Essential Tools and Materials
You don’t need a professional workshop to set the timing. Here’s what you’ll need:
- Screwdrivers
- Hex wrenches
- Marking chalk or tape
- A diagram of the Ruby’s valve gear (available in the user manual)
Preparing Your Workstation
Choose a clean, well-lit area with enough space to work comfortably. This reduces the risk of losing small components or making errors during adjustments.
Step-by-Step Guide to Setting Timing on an Accucraft Ruby
Accessing the Valve Gear
Begin by carefully removing the locomotive’s body shell to expose the internal mechanisms. This will give you a clear view of the valve gear and other components.
Understanding the Factory Settings
Study the factory settings of the valve gear, which serve as a baseline. Familiarise yourself with the alignment of the components.
Locating the Dead Center Position
The dead center is the point where the piston changes direction. Rotate the drive wheels slowly and mark the position where the piston stops moving. This step ensures your adjustments are accurate.
Adjusting the Eccentric Crank
Loosen the lock nuts on the eccentric crank and rotate it to align with the timing marks on your diagram. Be precise—small misalignments can lead to significant performance issues.
Testing and Fine-Tuning
Once the adjustments are made, reassemble the locomotive and run it at low pressure. Observe the motion and listen for irregularities. Fine-tune the eccentric crank as needed until the motion is smooth and consistent.
Troubleshooting Common Issues
Recognizing Timing Problems
Symptoms of improper timing include:
- Jerky or uneven motion
- Reduced speed or power
- Hissing or excessive steam leakage
Misalignment of Components
Double-check all adjustments if problems persist. Ensure the eccentric crank and valve gear are properly aligned and tightened.
Maintaining Proper Timing for Longevity
Regular Maintenance Tips
- Lubricate moving parts regularly to reduce wear.
- Inspect the valve gear and pistons for signs of damage or loosening.
Signs Your Timing Needs Re-Adjustment
If Ruby’s performance declines or you notice irregular movement, it’s time to revisit the timing adjustments.
Conclusion
The timing of How to Set the Timing on a Accucraft Ruby may initially feel like a challenging task, but it’s a skill worth learning. With patience, attention to detail, and the steps outlined in this guide, you can transform the process into an engaging and satisfying experience. Achieving proper timing doesn’t just improve the Ruby’s performance; it ensures smoother operation, extends the locomotive’s lifespan, and enhances your appreciation for its intricate mechanics.
So, gather your tools, take your time, and embrace this rewarding aspect of steam locomotion. Once you’ve set the timing correctly, you’ll unlock a newfound level of precision and pride in your Accucraft Ruby.
FAQs About How to Set the Timing on a Accucraft Ruby
- Can timing adjustments damage my Ruby if done incorrectly?
Yes, improper adjustments can cause performance issues or damage. Always follow the user manual and proceed carefully. - How often should timing be checked?
It’s good practice to check timing every six months or after extensive use. - What if I don’t have a timing diagram?
Diagrams are often included in the user manual or available online from Accucraft’s support resources. - How long does it take to set the timing?
With practice, the process can take around 1–2 hours, depending on the complexity of adjustments needed. - Can I improve performance without adjusting the timing?
While regular maintenance helps, precise timing adjustments are key to unlocking the best performance.